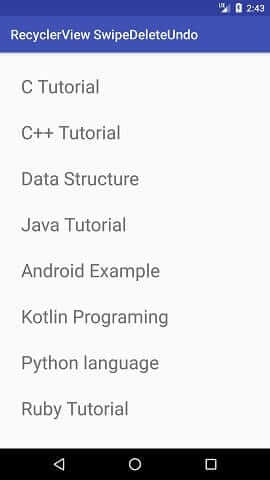
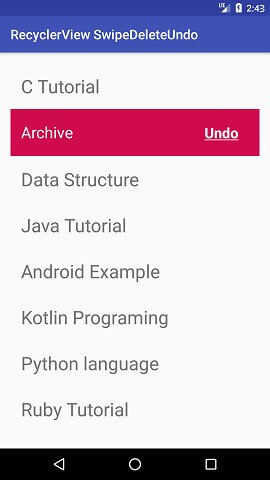
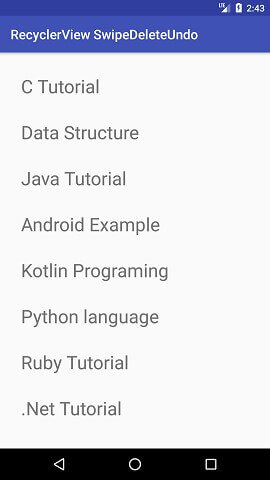
This class is used to create a swipe to delete the items of RecyclerView. It has a SimpleCallback class that configures the events which are performed to swipe or move the item of the RecyclerView.
Prerequisites
Before we begin, ensure you have:
- Basic knowledge of Android development.
- Android Studio installed.
- A project with a RecyclerView already set up.
ItemTouchHelper class
It is a utility class that provides the facility to add swipe to dismiss and drag & drops the items of RecyclerView. It overrides the callback methods onMove() or onSwipe() depending upon the functionality we implement. So lets try to implement Swipe to Delete RecyclerView items with UNDO
Must Read: Google Login And Registration For Android Using Firebase Authentication
Android Swipe to Delete RecyclerView items with UNDO Example
Step 1: Setting Up Your Layout Files
Start by defining your activity_main.xml and content_main.xml. These XML files will layout your main activity and include your RecyclerView fragment, respectively. The structure of these files is crucial for the proper display of your RecyclerView.
activity_main.xml
activity_main.xml
xml version="1.0" encoding="utf-8"?>
<android.support.design.widget.CoordinatorLayout xmlns:android="http://schemas.android.com/apk/res/android"
    xmlns:app="http://schemas.android.com/apk/res-auto"
    xmlns:tools="http://schemas.android.com/tools"
    android:layout_width="match_parent"
    android:layout_height="match_parent"
    android:fitsSystemWindows="true"
    tools:context="example.androidhire.com.recyclerviewswipedeleteundo.MainActivity">

    <android.support.design.widget.AppBarLayout
        android:layout_width="match_parent"
        android:layout_height="wrap_content"
        android:theme="@style/AppTheme.AppBarOverlay">

        <android.support.v7.widget.Toolbar
            android:id="@+id/toolbar"
            android:layout_width="match_parent"
            android:layout_height="?attr/actionBarSize"
            android:background="?attr/colorPrimary"
            app:popupTheme="@style/AppTheme.PopupOverlay" />

    android.support.design.widget.AppBarLayout>

    <include layout="@layout/content_main" />

android.support.design.widget.CoordinatorLayout>
content_main.xml
<fragment xmlns:android="http://schemas.android.com/apk/res/android" xmlns:app="http://schemas.android.com/apk/res-auto" xmlns:tools="http://schemas.android.com/tools" android:id="@+id/fragment"      android:name="example.androidhire.com.recyclerviewswipedeleteundo.MainActivityFragment"
android:layout_width="match_parent"    android:layout_height="match_parent" app:layout_behavior="@string/appbar_scrolling_view_behavior"    tools:layout="@layout/fragment_main" />
MainActivity.java
package example.androidhire.com.recyclerviewswipedeleteundo;
import android.os.Bundle;
import android.support.v7.app.AppCompatActivity;
import android.support.v7.widget.Toolbar;
public class MainActivity extends AppCompatActivity {
   @Override protected void onCreate(Bundle savedInstanceState) {
super.onCreate(savedInstanceState);
setContentView(R.layout.activity_main);
Toolbar toolbar = (Toolbar) findViewById(R.id.toolbar);
setSupportActionBar(toolbar);
}
}
Step 2: Designing Item Layouts for Regular and Swipe States
Create regular_item.xml and swipe_item.xml layouts. The regular layout represents the normal view of your RecyclerView items, while the swipe layout will be displayed when an item is swiped.
regular_item.xml
xml version="1.0" encoding="utf-8"?>
 <LinearLayout xmlns:android="http://schemas.android.com/apk/res/android"
 android:id="@+id/regularLayout"
     android:layout_width="match_parent"
     android:layout_height="wrap_content"
     android:orientation="vertical"
     android:padding="@dimen/activity_horizontal_margin">

     <TextView
         android:id="@+id/list_item"
         android:layout_width="match_parent"
         android:layout_height="wrap_content"
         android:text="Regular Layout"
         android:textSize="28sp" />
LinearLayout>
Create a layout swipe_item.xml which appears at the period of swipe item
swipe_item.xml
xml version="1.0" encoding="utf-8"?>
 <LinearLayout xmlns:android="http://schemas.android.com/apk/res/android"
     android:id="@+id/swipeLayout"
     android:layout_width="match_parent"
     android:layout_height="wrap_content"
     android:background="@color/swipebackground"
     android:orientation="horizontal"
     android:padding="@dimen/activity_horizontal_margin"
     android:visibility="visible"
     android:weightSum="3">

     <TextView
         android:layout_width="match_parent"
         android:layout_height="wrap_content"
         android:layout_weight="1"
         android:text="@string/archived_label"
         android:textColor="@android:color/white"
         android:textSize="24sp" />


     <TextView
         android:id="@+id/undo"
         android:layout_width="match_parent"
         android:layout_height="wrap_content"
         android:layout_weight="2"
         android:gravity="end"
         android:paddingBottom="5dp"
         android:paddingLeft="16dp"
         android:paddingRight="16dp"
         android:paddingTop="5dp"
         android:text="@string/undo_label"
         android:textColor="@android:color/white"
         android:textSize="22sp"
         android:textStyle="bold" />
 LinearLayout>
Step 3: Combining Layouts in customlayout.xml
Combine both layouts in a customlayout.xml file. This layout will switch between the regular and swipe views based on user interactions.
xml version="1.0" encoding="utf-8"?>
<FrameLayout xmlns:android="http://schemas.android.com/apk/res/android"
     android:layout_width="match_parent"
     android:layout_height="wrap_content">

     <include layout="@layout/swipe_item" />

     <include layout="@layout/regular_item" />
FrameLayout>
Step 4: Implementing SwipeUtil.java
Create the SwipeUtil.java utility class extending ItemTouchHelper.SimpleCallback. Override methods like onMove(), onSwiped(), and onChildDraw() to handle swipe actions and visualize changes on the UI.
package example.androidhire.com.recyclerviewswipedeleteundo;

import android.content.Context;
import android.graphics.Canvas;
import android.graphics.Color;
import android.graphics.Paint;
import android.graphics.PorterDuff;
import android.graphics.drawable.ColorDrawable;
import android.graphics.drawable.Drawable;
import android.support.v4.content.ContextCompat;
import android.support.v7.widget.RecyclerView;
import android.support.v7.widget.helper.ItemTouchHelper;
import android.view.View;

public abstract class SwipeUtil extends ItemTouchHelper.SimpleCallback {

  private Drawable background;
  private Drawable deleteIcon;
  private int xMarkMargin;
  private boolean initiated;
  private Context context;
  private int leftcolorCode;
  private String leftSwipeLable;

  public SwipeUtil(int dragDirs, int swipeDirs, Context context) {
    super(dragDirs, swipeDirs);
    this.context = context;
  }

  private void init() {
    background = new ColorDrawable();
    xMarkMargin =
      (int) context.getResources().getDimension(R.dimen.ic_clear_margin);
    deleteIcon =
      ContextCompat.getDrawable(context, android.R.drawable.ic_menu_delete);
    deleteIcon.setColorFilter(Color.WHITE, PorterDuff.Mode.SRC_ATOP);
    initiated = true;
  }

  @Override
  public boolean onMove(
    RecyclerView recyclerView,
    RecyclerView.ViewHolder viewHolder,
    RecyclerView.ViewHolder target
  ) {
    return false;
  }

  @Override
  public abstract void onSwiped(
    RecyclerView.ViewHolder viewHolder,
    int direction
  );

  @Override
  public int getSwipeDirs(
    RecyclerView recyclerView,
    RecyclerView.ViewHolder viewHolder
  ) {
    return super.getSwipeDirs(recyclerView, viewHolder);
  }

  @Override
  public void onChildDraw(
    Canvas c,
    RecyclerView recyclerView,
    RecyclerView.ViewHolder viewHolder,
    float dX,
    float dY,
    int actionState,
    boolean isCurrentlyActive
  ) {
    View itemView = viewHolder.itemView;
    if (!initiated) {
      init();
    }

    int itemHeight = itemView.getBottom() - itemView.getTop();
    //Setting Swipe Background
    ((ColorDrawable) background).setColor(getLeftcolorCode());
    background.setBounds(
      itemView.getRight() + (int) dX,
      itemView.getTop(),
      itemView.getRight(),
      itemView.getBottom()
    );
    background.draw(c);

    int intrinsicWidth = deleteIcon.getIntrinsicWidth();
    int intrinsicHeight = deleteIcon.getIntrinsicWidth();

    int xMarkLeft = itemView.getRight() - xMarkMargin - intrinsicWidth;
    int xMarkRight = itemView.getRight() - xMarkMargin;
    int xMarkTop = itemView.getTop() + (itemHeight - intrinsicHeight) / 2;
    int xMarkBottom = xMarkTop + intrinsicHeight;

    //Setting Swipe Icon
    deleteIcon.setBounds(xMarkLeft, xMarkTop + 16, xMarkRight, xMarkBottom);
    deleteIcon.draw(c);

    //Setting Swipe Text
    Paint paint = new Paint();
    paint.setColor(Color.WHITE);
    paint.setTextSize(48);
    paint.setTextAlign(Paint.Align.CENTER);
    c.drawText(getLeftSwipeLable(), xMarkLeft + 40, xMarkTop + 10, paint);

    super.onChildDraw(
      c,
      recyclerView,
      viewHolder,
      dX,
      dY,
      actionState,
      isCurrentlyActive
    );
  }

  public String getLeftSwipeLable() {
    return leftSwipeLable;
  }

  public void setLeftSwipeLable(String leftSwipeLable) {
    this.leftSwipeLable = leftSwipeLable;
  }

  public int getLeftcolorCode() {
    return leftcolorCode;
  }

  public void setLeftcolorCode(int leftcolorCode) {
    this.leftcolorCode = leftcolorCode;
  }
}
Step 5: Creating the ItemViewHolder and MyAdapter Classes
Define your ItemViewHolder.java and MyAdapter.java classes. These classes will manage the RecyclerView items and handle the swipe-to-delete logic, including the undo functionality.
ItemViewHolder.java
package example.androidhire.com.recyclerviewswipedeleteundo;

import android.support.v7.widget.RecyclerView;
import android.view.View;
import android.widget.LinearLayout;
import android.widget.TextView;

public class ItemViewHolder extends RecyclerView.ViewHolder {

  public LinearLayout regularLayout;
  public LinearLayout swipeLayout;
  public TextView listItem;
  public TextView undo;

  public ItemViewHolder(View view) {
    super(view);
    regularLayout = view.findViewById(R.id.regularLayout);
    listItem = view.findViewById(R.id.list_item);
    swipeLayout = view.findViewById(R.id.swipeLayout);
    undo = view.findViewById(R.id.undo);
  }
}
MyAdapter.java
1. package example.androidhire.com.recyclerviewswipedeleteundo;
2.
3. import android.os.Handler;
4. import android.support.v7.widget.RecyclerView;
5. import android.view.LayoutInflater;
6. import android.view.View;
7. import android.view.ViewGroup;
8. import java.util.ArrayList;
9. import java.util.HashMap;
10. import java.util.List;
11.
12. public class MyAdapter extends RecyclerView.Adapter {
13.
14.     private List dataList;
15.     private List itemsPendingRemoval;
16.
17.     private static final int PENDING_REMOVAL_TIMEOUT = 3000; // 3sec
18.     private Handler handler = new Handler(); // hanlder for running delayed runnables
19.     HashMap pendingRunnables = new HashMap<>(); // map of items to pending runnable, to cancel the removal
20.
21.
22.     public MyAdapter(List dataList) {
23.         this.dataList = dataList;
24.         itemsPendingRemoval = new ArrayList<>();
25.     }
26.
27.     @Override
28.     public ItemViewHolder onCreateViewHolder(ViewGroup parent, int viewType) {
29.         View itemView = LayoutInflater.from(parent.getContext()).inflate(R.layout.customlayout, parent, false);
30.         return new ItemViewHolder(itemView);
31.     }
32.
33.     @Override
34.     public void onBindViewHolder(ItemViewHolder itemViewHolder, int position) {
35.
36.         final String data = dataList.get(position);
37.
38.         if (itemsPendingRemoval.contains(data)) {
39.             /** show swipe layout and hide regular layout */
40.             itemViewHolder.regularLayout.setVisibility(View.GONE);
41.             itemViewHolder.swipeLayout.setVisibility(View.VISIBLE);
42.             itemViewHolder.undo.setOnClickListener(new View.OnClickListener() {
43.                 @Override
44.                 public void onClick(View v) {
45.                     undoOpt(data);
46.                 }
47.             });
48.         } else {
49.             /** show regular layout and hide swipe layout*/
50.             itemViewHolder.regularLayout.setVisibility(View.VISIBLE);
51.             itemViewHolder.swipeLayout.setVisibility(View.GONE);
52.             itemViewHolder.listItem.setText(data);
53.         }
54.     }
55.
56.     private void undoOpt(String customer) {
57.         Runnable pendingRemovalRunnable = pendingRunnables.get(customer);
58.         pendingRunnables.remove(customer);
59.         if (pendingRemovalRunnable != null)
60.             handler.removeCallbacks(pendingRemovalRunnable);
61.         itemsPendingRemoval.remove(customer);
62.         // this will rebind the row in "normal" state
63.         notifyItemChanged(dataList.indexOf(customer));
64.     }
65.
66.     @Override
67.     public int getItemCount() {
68.         return dataList.size();
69.     }
70.
71.     public void pendingRemoval(int position) {
72.
73.         final String data = dataList.get(position);
74.         if (!itemsPendingRemoval.contains(data)) {
75.             itemsPendingRemoval.add(data);
76.             // this will redraw row in "undo" state
77.             notifyItemChanged(position);
78.             //create, store and post a runnable to remove the data
79.             Runnable pendingRemovalRunnable = new Runnable() {
80.                 @Override
81.                 public void run() {
82.                     remove(dataList.indexOf(data));
83.                 }
84.             };
85.             handler.postDelayed(pendingRemovalRunnable, PENDING_REMOVAL_TIMEOUT);
86.             pendingRunnables.put(data, pendingRemovalRunnable);
87.         }
88.     }
89.
90.     public void remove(int position) {
91.         String data = dataList.get(position);
92.         if (itemsPendingRemoval.contains(data)) {
93.             itemsPendingRemoval.remove(data);
94.         }
95.         if (dataList.contains(data)) {
96.             dataList.remove(position);
97.             notifyItemRemoved(position);
98.         }
99.     }
100.
101.     public boolean isPendingRemoval(int position) {
102.         String data = dataList.get(position);
103.         return itemsPendingRemoval.contains(data);
104.     }
105. }
Step 6: Setting Up MainActivityFragment
In your MainActivityFragment.java, initialize and set up your RecyclerView with the adapter and attach the SwipeUtil functionality.
fragment_main.xml
<RelativeLayout xmlns:android="http://schemas.android.com/apk/res/android"
    xmlns:tools="http://schemas.android.com/tools" android:layout_width="match_parent"
    android:layout_height="match_parent" android:paddingBottom="@dimen/activity_vertical_margin"
    android:paddingLeft="@dimen/activity_horizontal_margin" android:paddingRight="@dimen/activity_horizontal_margin"
    android:paddingTop="@dimen/activity_vertical_margin"
    tools:context="example.androidhire.com.recyclerviewswipedeleteundo.MainActivityFragment"
    tools:showIn="@layout/activity_main">

    <android.support.v7.widget.RecyclerView android:id="@+id/recyclerView" android:layout_width="match_parent"
        android:layout_height="match_parent" />
RelativeLayout>
MainActivityFragment.java
	package example.androidhire.com.recyclerviewswipedeleteundo;
	import android.support.v4.app.Fragment;
	import android.os.Bundle;
	import android.support.v4.content.ContextCompat;
	import android.support.v7.widget.LinearLayoutManager;
	import android.support.v7.widget.RecyclerView;
	import android.support.v7.widget.helper.ItemTouchHelper;
	import android.view.LayoutInflater;
	import android.view.View;
	import android.view.ViewGroup;
	import java.util.ArrayList;
	import java.util.List;

	public class MainActivityFragment extends Fragment {

	    private RecyclerView mRecyclerView;
	    private MyAdapter myAdapter;
	    String[] listValue = {"C Tutorial","C++ Tutorial","Data Structure","Java Tutorial","Android Example","Kotlin Programing","Python language","Ruby Tutorial",".Net Tutorial","MySQL Database"};
	    public MainActivityFragment() {
	    }

	    @Override
	    public View onCreateView(LayoutInflater inflater, ViewGroup container,
	                             Bundle savedInstanceState) {
	        View mView = inflater.inflate(R.layout.fragment_main, container, false);
	        mRecyclerView = mView.findViewById(R.id.recyclerView);
	        return mView;
	    }

	    @Override
	    public void onResume() {
	        super.onResume();
	        LinearLayoutManager linearLayoutManager = new LinearLayoutManager(getActivity());
	        linearLayoutManager.setOrientation(LinearLayoutManager.VERTICAL);
	        mRecyclerView.setLayoutManager(linearLayoutManager);
	        myAdapter = new MyAdapter(getData());
	        mRecyclerView.setAdapter(myAdapter);

	        setSwipeForRecyclerView();
	    }

	    private List<String> getData() {
	        List<String> modelList = new ArrayList<>();
	        for (int i = 0; i < listValue.length; i++) {
	            modelList.add(listValue[i]);
	        }
	        return modelList;
	    }

	    private void setSwipeForRecyclerView() {

	        SwipeUtil swipeHelper = new SwipeUtil(0, ItemTouchHelper.LEFT, getActivity()) {
	            @Override
	            public void onSwiped(RecyclerView.ViewHolder viewHolder, int direction) {
	                int swipedPosition = viewHolder.getAdapterPosition();
	                myAdapter = (MyAdapter)mRecyclerView.getAdapter();
	                myAdapter.pendingRemoval(swipedPosition);
	            }

	            @Override
	            public int getSwipeDirs(RecyclerView recyclerView, RecyclerView.ViewHolder viewHolder) {
	                int position = viewHolder.getAdapterPosition();
	                myAdapter = (MyAdapter) mRecyclerView.getAdapter();
	               if (myAdapter.isPendingRemoval(position)) {
	                     return 0;
	                }
	                return super.getSwipeDirs(recyclerView, viewHolder);
	            }
	        };
	        ItemTouchHelper mItemTouchHelper = new ItemTouchHelper(swipeHelper);
	        mItemTouchHelper.attachToRecyclerView(mRecyclerView);
	        //set swipe label
	        swipeHelper.setLeftSwipeLable("Archive");
	        //set swipe background-Color
	        swipeHelper.setLeftcolorCode(ContextCompat.getColor(getActivity(), R.color.swipebackground));
	    }
}
strings.xml
<resources>
     <string name="app_name">RecyclerView SwipeDeleteUndostring>
     <string name="action_settings">Settingsstring>
     <string name="hello_blank_fragment">Hello blank fragmentstring>
     <string name="undo_label"><u>Undou>string>
     <string name="archived_label">Archivestring>
resources>
dimens.xml
<resources>
<dimen name="fab_margin">16dpdimen>
     <dimen name="activity_horizontal_margin">16dpdimen>
     <dimen name="activity_vertical_margin">16dpdimen>
     <dimen name="ic_clear_margin">56dpdimen>
     <dimen name="text_size_medium">20spdimen>
resources>
colors.xml
xml version="1.0" encoding="utf-8"?>
<resources>
<color name="colorPrimary">#3F51B5color>
<color name="colorPrimaryDark">#303F9Fcolor>
<color name="colorAccent">#FF4081color>
<color name="swipebackground">#cf0b4ecolor>
resources>
Outputs:


Final Words
Integrating Swipe-to-Delete with an Undo option in your Android app not only makes your RecyclerView more interactive but also significantly improves the user experience. It reflects thoughtfulness in design, catering to the users' needs for easy management and recovery of their list items.
This functionality, when implemented correctly, can make your app stand out in terms of usability. As you develop your Android app, remember that such small details can make a big difference in how users perceive and interact with your app. Happy coding!


