How to Crop a Video on iPhone (2026): Photos, iMovie & CapCut
To crop a video on iPhone, open it in the Photos app, tap Edit, tap the Crop icon, drag the corners, then tap Done. It takes about five seconds, costs nothing, adds no watermark, and you can undo it later with Revert. Use iMovie when you want to zoom in or cut a piece out of the middle. Use CapCut when you want a Reels-ready 9:16 crop with captions. Everything below was re-checked on iOS 26.6 in July 2026.
In a hurry? Jump to: Crop in Photos · Crop in iMovie · Best apps · Comparison table · Keep it sharp · Aspect ratios · Batch crop · Fixes · FAQ
| Quick answer | What to use |
|---|---|
| Fastest crop, no watermark, undoable | Photos > Edit > Crop |
| Change shape for Reels or YouTube | Photos crop presets (9:16, 1:1, 16:9) |
| Zoom in closer on the subject | iMovie, pinch to zoom |
| Delete a section from the middle | iMovie Split, then Delete |
| Crop plus captions and effects | CapCut or free Premiere on iPhone |
| Crop many clips at once | A batch app, or one shared iMovie project |
Here is the part most guides skip: your iPhone has three different tools that people all call "crop," and they do different jobs. Pick the wrong one and you get black bars, a soft picture, or a video you cannot undo. This guide shows which tool does what, and how much you can safely crop before the picture starts to look bad.
Which crop tool do you actually need?
Cropping a video means cutting away the outer edges of the picture so what is left fills the screen. It is not the same as trimming, which shortens how long the video runs. The iPhone handles those two jobs in different places, and that is where most people get stuck.
- Cut off the edges of the picture (a stray hand, an ugly wall) → Photos app.
- Change the shape of the video, like wide to tall for Reels → Photos app presets.
- Zoom in closer on your subject → iMovie (pinch to zoom).
- Cut a boring bit out of the middle (that is trimming, not cropping) → iMovie Split.
- Crop plus captions, music, and effects → CapCut or the free Premiere on iPhone.
Good to know: the Photos crop tool changes the frame only. It cannot delete a section of time from the middle of a clip. That job needs iMovie.
What do you need before you start?
- Update your iPhone. Go to Settings > General > Software Update. Apple shipped iOS 26.6 at the end of July 2026. The crop tool works the same way it has since iOS 13, so older iPhones are fine too.
- Check your free space. Editing 4K needs room to write a new file. Settings > General > iPhone Storage. Deleted something you needed? See how photo recovery works.
- Duplicate the clip first if it matters. Tap the video, then Share > Duplicate. Now you can experiment without any worry.
Method 1: How do you crop a video in the Photos app? (fastest)
This is the one to use nine times out of ten. It is free, built in, leaves no watermark, and it is reversible.
Step 1: Open the video and tap Edit
- Open Photos and tap the video.
- Tap Edit in the top-right corner.
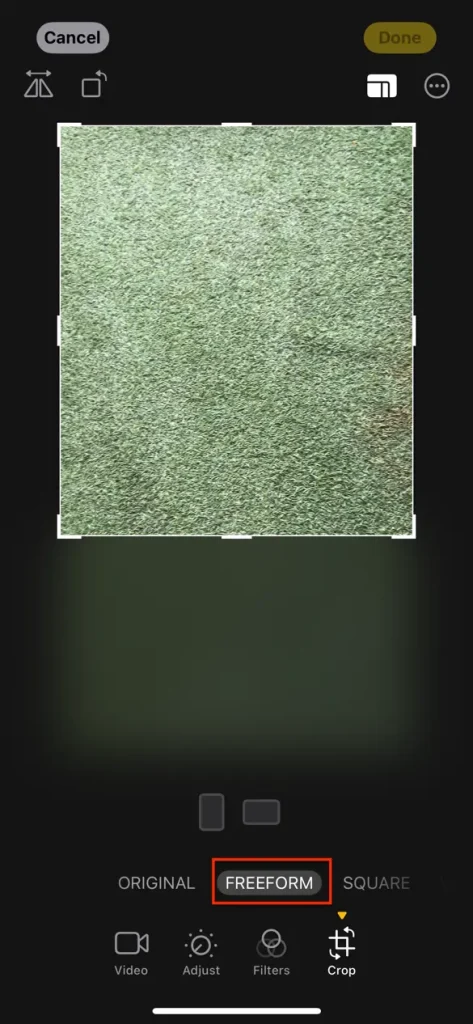
Step 2: Tap the Crop icon
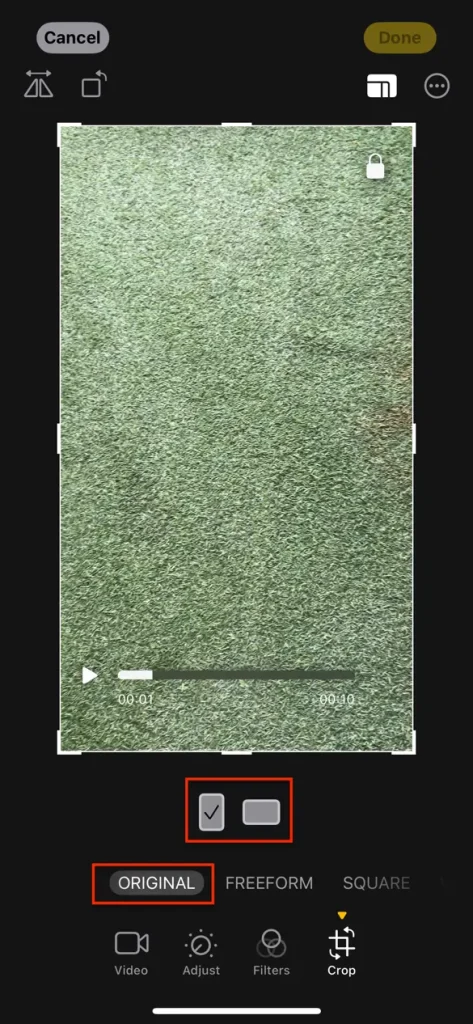
At the bottom of the editor, tap the Crop icon. It looks like two overlapping right angles. The frame around your video becomes grabbable.

Step 3: Set your frame
Two ways to do it:
- Free-hand: drag any corner inward. Pinch with two fingers to push in closer, and drag the picture around to re-center it.
- Locked shape: tap the aspect-ratio icon at the top right and pick Square (1:1), 9:16, 16:9, 5:4, or 4:3. Use this when the video is going to a specific app, so nothing gets chopped off later.
While you are in here you can also rotate the clip 90 degrees, flip it like a mirror, or drag the straighten dial to fix a tilted horizon. All of it applies to the whole video, not just one frame.
Step 4: Tap Done — your original is still safe
- Tap Done in the bottom-right corner.
- The clip in your library now shows the crop. Apple's editing is non-destructive, which is a fancy way of saying the untouched original is still stored underneath.
- Changed your mind, even weeks later? Tap Edit > Revert > Revert to Original.
The catch nobody mentions: Revert only works inside your own Photos library. The second you AirDrop, message, upload, or save that clip somewhere else, the crop is baked in permanently. So if you are sending a cropped video to a client or a group chat, keep a copy at home first.
Also Read: The Best Photo and Video Apps for iPhone Creators
Method 2: How do you zoom in or cut out the middle? (iMovie)
iMovie is Apple's free editor. Use it for the two things Photos cannot do: zoom into the shot, and delete a chunk from the middle.
Step 1: Start a project
- Open iMovie and tap Start New Project > Movie.
- Pick your video and tap Create Movie.
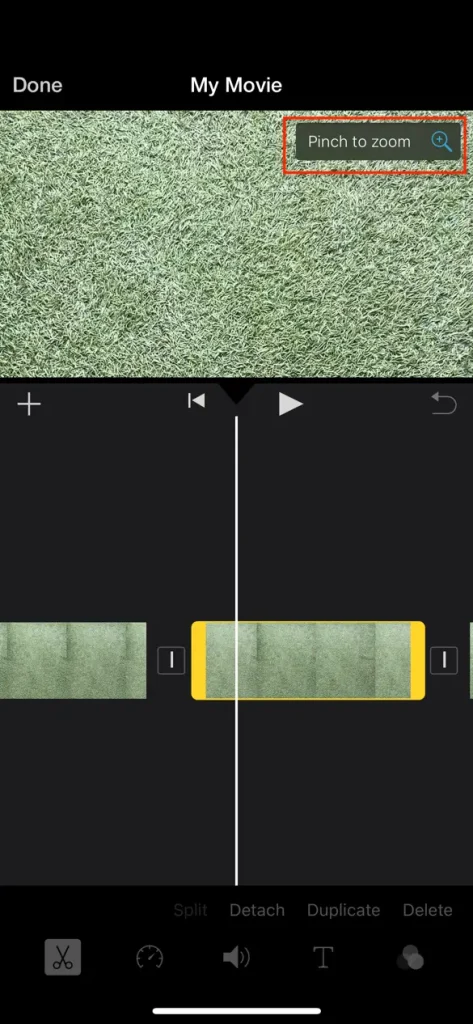
Step 2: Pinch to zoom (this is iMovie's "crop")
- Tap the clip in the timeline so it turns yellow.
- Tap the magnifying-glass icon at the top right of the preview.
- Spread two fingers to zoom in, then drag to choose what stays in frame.
Important limit: iMovie on iPhone does not change the video's shape. It fills the project's frame instead. So if you want a tall 9:16 video, crop the shape in Photos first, then bring it into iMovie for the zoom. Doing it the other way round leaves you with black bars.
Step 3: Delete a section from the middle
- Slide the timeline so the playhead sits where the bad part starts. Tap the clip, then tap Split.
- Slide to where the bad part ends and tap Split again. The unwanted section is now its own piece.
- Tap that middle piece and tap Delete. The two good halves snap together on their own.

Step 4: Export at full quality
- Tap Done at the top left.
- Tap the Share icon, then Save Video.
- Pick the highest setting offered that matches your source — 1080p for 1080p footage, 4K for 4K footage. Never pick lower.
Method 3: What are the best iPhone crop apps in 2026?
If you crop for social media every week, a dedicated app saves real time. Here is where each one stands in July 2026.
1. CapCut — best for social clips
- Crop to any ratio, add captions, trending audio, and effects in one place.
- Watermark truth: a plain crop-and-export is clean. The watermark shows up when you use a template or effect marked with the crown icon.
- Free exports top out at 1080p. Paid tiers in 2026 run about $10/month (Standard) and $20/month (Pro, which unlocks 4K).
- capcut.com
2. Premiere on iPhone — best free power tool
- Adobe pulled Premiere Rush from stores on September 30, 2025, and support ends September 30, 2026. Do not start a new project in it.
- The replacement, Premiere on iPhone, is free, has multi-track editing, and now includes a real crop tool (it was missing at launch and added later after user requests).
- Adobe's official end-of-life notice
3. InShot — best for quick ratio swaps
- One-tap canvas presets for every platform, plus manual cropping.
- The free tier adds a short end-card watermark. Paid removes it.
- inshot.com
4. Splice — best for music-led edits
- Proper crop and aspect-ratio controls with a big licensed music library.
- spliceapp.com
5. LumaFusion — best if you edit on iPhone seriously
- A one-time purchase, not a subscription. Multi-track timeline, frame-accurate crop and keyframed zoom, and it handles 4K without choking.
- Overkill for a single crop. Worth it if you cut video every week.
- luma-touch.com
6. Video Crop — best one-job app
- Does nothing but crop and resize. No timeline, no learning curve. Drag the box, pick a preset, export.
- Good pick if the Photos app crop is misbehaving on a specific clip.
Photos vs iMovie vs apps: quick comparison
| Method | Cost | Changes shape (ratio) | Zoom in | Cut the middle | Watermark | Best for |
|---|---|---|---|---|---|---|
| Photos app | Free, built in | Yes | Yes (pinch) | No | None | Fast, reversible crops |
| iMovie | Free | No | Yes | Yes (Split) | None | Zooming and cutting |
| CapCut | Free / $10-$20 mo | Yes | Yes | Yes | Only on crown items | Reels, Shorts, TikTok |
| Premiere on iPhone | Free | Yes | Yes | Yes | None | Desktop-style editing |
| LumaFusion | One-time buy | Yes | Yes | Yes | None | Serious mobile editing |
| InShot | Free / paid | Yes | Yes | Yes | Free end-card | Quick ratio swaps |
How much can you crop before it looks bad?
Cropping throws pixels away. That is just how it works. But you can do the math ahead of time so it never shows.
Your target is simple: the piece you keep should still be at least as many pixels as the screen it will play on. Most phones and social apps are happy at 1080p (1920 x 1080). Here is what that leaves you:
| You shot in | Pixels | Safe zoom before it drops under 1080p |
|---|---|---|
| 4K | 3840 x 2160 | Up to 2x — you can throw away half the width |
| 1080p | 1920 x 1080 | None — any crop puts you below 1080p |
| 720p | 1280 x 720 | Already under 1080p; crop as little as possible |
That single table is the reason we tell people to shoot 4K when they know a crop is coming: Settings > Camera > Record Video > 4K. A 4K clip cropped hard still hands you a clean 1080p result. A 1080p clip cropped the same amount looks mushy.
Four more habits that keep footage sharp:
- Crop once, export once. Every save re-compresses the video. Do all your edits in one sitting instead of saving, reopening, saving again.
- Never export below the source. Exporting a 4K clip at 720p undoes all your care.
- Crop to the exact ratio the platform wants. If you upload a shape the app does not like, the app crops it for you, badly.
- Watch out for the Files detour. Saving a clip out to Files or iCloud Drive can convert Apple's HEVC into H.264, which is an extra squeeze on quality. Keep edits inside Photos or iMovie when you can.
Aspect ratio cheat sheet
| Where it is going | Ratio | Pixel size to aim for |
|---|---|---|
| Instagram Reels, Stories, TikTok, YouTube Shorts | 9:16 | 1080 x 1920 |
| Instagram feed (portrait) | 4:5 | 1080 x 1350 |
| Square feed post | 1:1 | 1080 x 1080 |
| YouTube (normal), X, Facebook | 16:9 | 1920 x 1080 |
Rule of thumb: vertical for anything that plays full screen, wide for anything watched on a TV or laptop. When in doubt, keep a 16:9 master and make a 9:16 copy from it.
Posting to Instagram? Our guide to Instagram’s Quiet Mode covers the other settings worth knowing before you post.
How to crop several videos at once
This is the question almost no guide answers, so here is the straight version.
Photos lets you copy and paste some edits between clips — filters, exposure, colour tweaks. Crop is not one of them. There is no "paste crop" and no multi-select crop in Photos or iMovie. If you have 30 clips to reframe, doing it by hand in Photos is a long evening.
Your real options:
- A batch app. Apps like Batch Videos Edit load a whole pile of clips and apply one crop, ratio, or rotation to all of them at once. This is the only true one-tap route on iPhone.
- One project in iMovie or LumaFusion. Drop every clip into a single 9:16 project. They all render to that shape together, and you export once.
- Do it on a computer. For dozens of files, a desktop tool is simply faster and lets you keep the original codec instead of re-squeezing each file.
Cropping on iPad or Mac instead
- iPad: exactly the same steps. Photos > Edit > Crop. The bigger screen makes hand-dragging the frame far more accurate, so use it if you have one nearby.
- Mac: Photos on macOS has the same crop tool, and iMovie for Mac adds real Fit, Crop to Fill, and Ken Burns options that the iPhone version does not have. If a crop needs to be exact, do it here.
- Your iCloud library keeps everything in sync, so you can shoot on the phone and crop on the Mac without transferring anything.
Why can’t I crop my video? Common problems, fixed
The Crop icon is missing or greyed out
Make sure you tapped Edit first, and that the file really is a video, not a Live Photo or a screen recording still syncing from iCloud. If the clip shows a small cloud icon, wait for the full-size version to download. Then update iOS and force-close Photos.
The Done button is greyed out when trimming
A known quirk. The fix that works for most people: trim the end of the clip first, then the beginning. Doing it in the other order can leave Done stuck. If it still will not save, open the clip in iMovie and export from there.
The crop looks fine but throws an error when saving
Usually an old or slightly damaged file, often one imported from another phone or a messaging app. Duplicate the clip (Share > Duplicate) and crop the copy. If the copy also fails, run it through iMovie, which re-writes the file cleanly on export.
The video looks soft or blurry now
You cropped too far, or exported too small. Tap Edit > Revert > Revert to Original and start again with a gentler crop, checking the table above.
There are black bars on the sides
The video's shape does not match the frame it is playing in. Crop to the destination ratio in Photos rather than letting the app or iMovie pad it out.
iMovie keeps crashing on a 4K clip
4K editing is heavy. Close background apps, restart the phone, and let it cool if it feels warm. If it still crashes, work on a 1080p copy.
"Not enough storage" when saving
Empty Recently Deleted inside Photos (it holds files for 30 days), then check Settings > General > iPhone Storage and offload apps you do not use.
How we tested this
We ran the same two clips — one shot in 4K at 60fps, one in 1080p — through every method here on an iPhone running iOS 26.6 in July 2026, then compared the exports side by side on a phone and on a 27-inch monitor. For each tool we checked four things: does it keep the source resolution, does it force a watermark on a plain crop, can it remove a section from the middle, and how many taps stand between you and a finished file. App status and pricing were confirmed against each company's own pages, including Adobe's Premiere Rush end-of-life notice and Apple's own iPhone User Guide, so nothing here points you to an app that has been pulled.
Last checked: 27 July 2026 on iOS 26.6. We re-verify this guide with every major iOS release.
Bottom line
Use the Photos app for almost everything: it is instant, free, watermark-free, and you can always hit Revert. Switch to iMovie when you need to zoom in or cut something out of the middle. Install CapCut or the free Premiere on iPhone when the video needs captions and effects too.
And remember the one rule that saves the most footage: shoot in 4K whenever you know you will crop later. It is the difference between a crisp Reel and a fuzzy one.
Your turn: open Photos, pick a clip you never posted because the framing was off, and give it a 9:16 crop. It takes five seconds. Then keep going with our guides on setting any song as a ringtone, the best AI apps for iPhone, and the best photo and video apps.
Frequently Asked Questions
How do you crop a video on an iPhone?
Open the video in the Photos app and tap Edit, then tap the Crop icon at the bottom. Drag the corners to reframe it, or tap the aspect-ratio icon at the top right to pick a preset like 1:1, 9:16, or 16:9. Tap Done to save. The whole thing takes about five seconds and works on any iPhone running iOS 13 or later, including iOS 26.6.
Can you crop a video on iPhone without losing quality?
Mostly, yes. The Photos app adds no watermark and does not shrink your footage on its own, so a light crop looks the same as the original. But cropping always throws away pixels, so the rule is simple: whatever you keep should still be at least 1920 x 1080. A 4K clip can survive up to a 2x zoom and still be full HD. A 1080p clip has no spare room at all.
How do I undo a crop on my iPhone video?
Open the clip in Photos, tap Edit, then tap Revert and choose Revert to Original. Apple stores the untouched original underneath, so this works even weeks later. One warning: Revert only works inside your own library. Once you AirDrop, upload, or message the cropped clip, that copy is permanent.
Can the iPhone Photos app cut out the middle of a video?
No. The Photos crop tool only reframes the picture, and its trim slider can shorten the start or end. To remove a section from the middle, use iMovie: move the playhead to where the bad part begins and tap Split, do the same at the end, then select the middle piece and tap Delete. The two halves join automatically.
What is the best free app to crop a video on iPhone?
The built-in Photos app, for most people. It is instant, reversible, and never watermarks. For zooming or cutting sections, iMovie is the best free option. For social videos with captions and effects, CapCut is the most popular free choice in 2026, and Adobe's free Premiere on iPhone now has a proper crop tool for anyone who wants desktop-style editing.
Why is there a black bar on my video after using iMovie?
Because iMovie on iPhone does not change a video's shape. It zooms inside the project frame instead, so a wide clip in a tall project gets padded with black. Fix it by cropping to the shape you want in the Photos app first, then bringing that cropped clip into iMovie for any zooming.
Does CapCut put a watermark on cropped videos?
Not on a plain crop and export. The watermark only appears when you use a template or effect marked with the crown icon. Free CapCut exports are capped at 1080p in 2026, with paid tiers around $10 a month for Standard and $20 a month for Pro, which unlocks 4K.
Is Adobe Premiere Rush still usable for cropping in 2026?
It is on the way out. Adobe removed Premiere Rush from app stores on September 30, 2025, and support ends on September 30, 2026. The replacement is the free Premiere on iPhone app, which added a real crop tool after launch. If you still have Rush projects, move them over now.
What aspect ratio should I crop to for Reels, TikTok, and Shorts?
Use 9:16 vertical at 1080 x 1920 for Instagram Reels and Stories, TikTok, and YouTube Shorts. Use 4:5 (1080 x 1350) for an Instagram feed post, 1:1 for square, and 16:9 (1920 x 1080) for normal YouTube, X, and Facebook. Cropping to the right shape yourself stops the platform from cropping it badly for you.
Can you crop several videos at once on iPhone?
Not in the Photos app. Photos can copy and paste some edits between clips, such as filters and colour adjustments, but crop is not one of them, and there is no multi-select crop. To batch crop, use an app built for it like Batch Videos Edit, or drop every clip into one iMovie or LumaFusion project set to the ratio you want and export once.
Why is the Done button greyed out when I edit a video?
It is a known Photos quirk when trimming. Try trimming the end of the clip first and the start second, which clears it for most people. If the crop still will not save, the file may be damaged, often one imported from another phone or a chat app. Duplicate the clip and edit the copy, or export it through iMovie instead.
Can I crop an iPhone video on my Mac or iPad?
Yes, and it is often easier. Photos on iPad and Mac has the same crop tool, and the bigger screen makes dragging the frame more precise. iMovie for Mac also adds Fit, Crop to Fill, and Ken Burns options that the iPhone version lacks. With iCloud Photos on, the clip is already there, so there is nothing to transfer.